Many of us have gotten used to being able to dampen unwanted sound, thanks to the noise-cancellation technology found in, for example, Apple’s AirPods Pro earbuds. But this tech gets you only so far: Noise cancellation works just for relatively low frequencies, and the overall hearing protection that earbuds can offer is also relatively limited. Earplugs or over-the-ear defenders are an option, but they block wanted as well as unwanted sounds. There are industrial solutions that pass through sounds in specific frequency ranges, but these are targeted at speech. As a musician who plays loud music, I want a way to protect my hearing and to be able to hear myself, my bandmates, and the audience with high fidelity.
For years, I have been trying to improve my personal audio-monitoring situation without going to the expense of the systems used by professional touring bands, which include custom-molded earpieces. Now, after countless versions of wiring things together, and even designing my own audio mixers, I finally have a DIY solution that works within a reasonable budget. My approach was to adapt an idea used in some pass-through systems, placing ambient microphones on the outside of sound-isolating headphones. I would capture the signal from these external mics at high quality and feed it into the headphones at the desired volume.
Of course, easier said than done. For my first prototype, I bought a set of US $40 ear defenders that had a built-in AM/FM radio, which fed into small speakers in the ear “cans” and extracted the radio electronics to make some space. I then hooked up a chain of breakout boards from my full-time employer, SparkFun Electronics: A $7 ICS-40180 MEMS microphone, a $6 TSH82 op-amp, and an $11 TPA2016D2 class-D amplifier. My initial testing went okay, in that I could hear the sound from the mics when I wore the defenders, but I quickly noticed a problem.
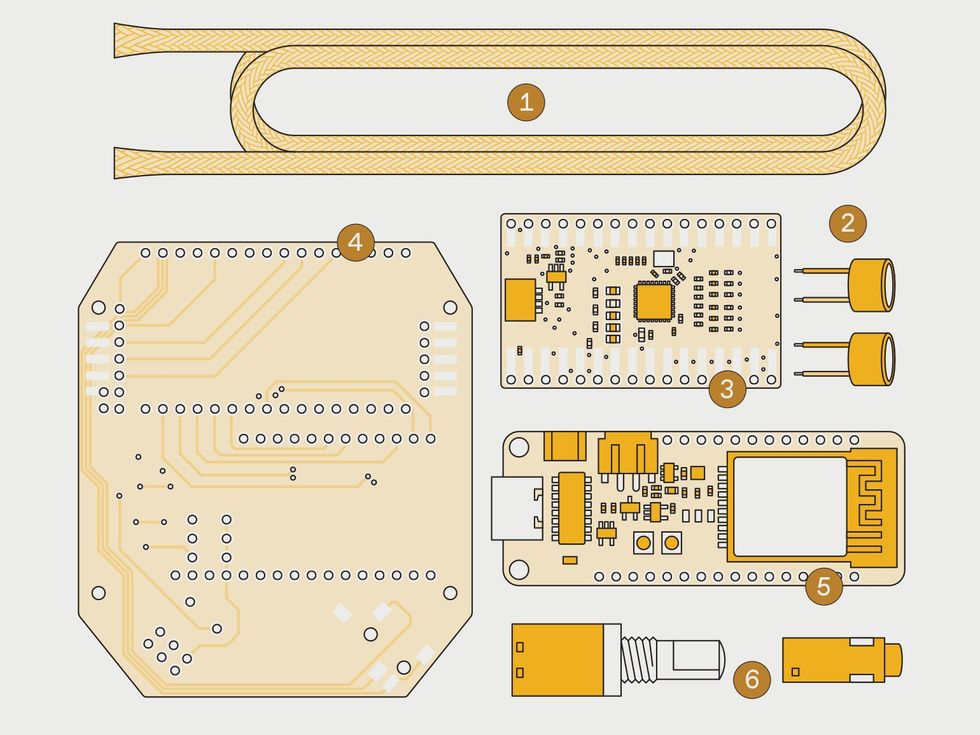 The author needed a properly shielded grounded cable (1) to bring in a signal from the left microphone (2) to the audio codec board (3), which is mounted on a custom circuit board (4) inside the right headphone. Also mounted on the board are the ESP32 microcontroller (5) and a volume control and audio jack (6). James Provost
I’m a drummer. When I played very gently on my drum set, the audio was clear, but as soon as I hit a drum with even moderate force, the pass-through signal became rudely distorted, or clipped. Puzzled, I checked the specs of the microphone. The datasheet indicated it had an acoustic overload point (AOP) of 124 decibels. It seemed like the microphone should be more than capable of handling an acoustic drum set—which, according to my calibrated sound-level meter, was producing a peak of only 115 dB during my hardest-hitting playing.
The microphone’s breakout board applies a gain of 64x, using two stages. My first thought was to reduce this gain. Maybe the clipping was happening at only the first gain stage. Unfortunately, even with this gain eliminated, the clipping remained. I then tested the raw MEMS microphone output by feeding it into some “pro grade” mic preamps. With this setup, I was able to see that the problem wasn’t the amplification stages but that the mics themselves were producing the clipping. Through this test, I learned a valuable lesson: A mic’s listed AOP is the point at which the microphone will produce a 10 percent total harmonic distortion, and so noticeable clipping can actually start to happen well below this level.
I was on the hunt for another cheap small MEMS mic that could handle louder sound sources. I found the Vesper VM2020, with an impressive AOP of 149 dB! I spun up a new breakout board for the VM2020 and was testing it in no time. Initial results were good—the VM2020 did not clip the signal no matter how hard I played! However, due to the middling sensitivity of this microphone (–63 dB), it was necessary to add a lot of gain to the signal. Combined with the microphone’s equally middling signal-to-noise ratio of 50 dB, this resulted in too much hiss in the output for my musical needs. I went on the hunt for yet another microphone. I found the $5 AOM-5035L by PUI Audio, which is an electret condenser type. This microphone had three important specs: high AOP (135 dB), good sensitivity (–35 dB), and a better signal-to-noise ratio of 75 dB.
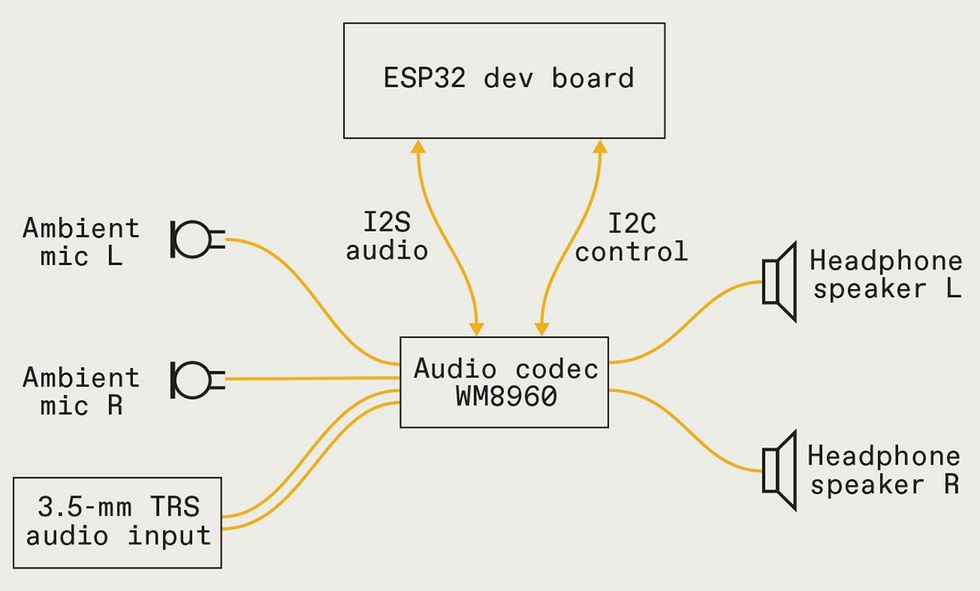 The WM8960 audio codec translates incoming sound signals—whether they’re analog from the microphones, an audio cable, or digital signals received from the ESP32 microcontroller—into audible sounds that a wearer can hear. The ESP32 also configures the codec board on startup.James Provost
Around the time of finding this microphone, I had just completed another breakout board for SparkFun. It was for the audio codec chip by Wolfson, the $18 WM8960. This board was more suited for this project than my previous choice, the TPA2016D2. The WM8960 has a quieter initial gain stage that’s designed for microphones. However, I now needed a microcontroller to initialize and control the WM8960. I chose the $10 ESP32 because it would allow me to operate the WM8960 and also accept audio via a Bluetooth connection from, say, my phone, and stream it to the WM8960.
I created a motherboard PCB to ensure everything fitted nicely into the right ear can of my hacked ear defenders. On the outside of each can I placed a microphone to provide stereo sound. (A detailed step-by-step guide is available on the SparkFun website.) Soon I was enjoying a clean audio signal with no clipping and no hiss during my drum rehearsals. But in a last wrinkle, I noticed that sometimes there was a small whining noise that would vary in pitch in the left audio channel. This became more pronounced when the batteries were getting low, and if I turned off the ESP32’s Bluetooth, some of the noise would go away. In an attempt to solve this, I first added a separate and dedicated ground connection from the left microphone back to the electronics in the right ear can. This reduced the whine but did not remove it entirely. I finally used a proper shielded microphone cable to connect the microphone to the WM8960. This eliminated the noise completely. Success! I’ve been playing away with protected hearing, and for less than $100 and some bench time, you too can have your very own custom set of Superheadphones!